The Gameplay Ability System (GAS) is a feature released by Epic as a plugin for Unreal Engine 4 and later. According to the documentation:
The Gameplay Ability System is a framework for building attributes, abilities, and interactions that an Actor can own and trigger. The system is designed to be adapted to a wide variety of Gameplay-Driven projects such as Role-Playing Games (RPGs), Action-Adventure games, and Multiplayer Online Battle Arenas games (MOBA).
If you’re not already familiar with it, you might be inclined to think that it’s not very useful outside of those genres, but it’s versatile enough to drive almost any type of gameplay action. In this post, I’ll give a high-level introduction to GAS by breaking it down into its constituent parts and going through a simple example of a GAS-driven gameplay feature.
Breaking it down
At a very high level, you can think of GAS as having three major elements: Gameplay Abilities, Gameplay Attributes, and Gameplay Effects. These are abstract concepts that encompass a very broad range of gameplay scenarios.
Gameplay Abilities can include almost any kind of action that an actor or component can perform. Examples include:
- Character movement abilities like walk and jump
- Character combat abilities like punch and kick
- Ranged weapon abilities like fire and aim down sights
- Melee weapon abilities like light attack and heavy attack
Gameplay Attributes are floating-point values that represent finite resources such as health and stamina. They can also be used to represent values that are used to modify other attributes, such as damage and stamina regeneration values.
Gameplay Effects are changes triggered by executing abilities. They can be broken down further by their properties:
- Duration. Every effect has one of three duration types: instant, limited duration (where the effect is usually intended to last seconds or minutes at most), or infinite (where the effect is completely passive until it’s removed).
- Behaviours:
- Components. These define special behaviours such as blocking other effects and granting abilities.
- Modifiers. These define how the effect interacts with attributes, including conditions that must be met for changes to occur.
- Executions. These define custom behaviours that occur when the effect executes.
- Gameplay Cues. These can be used to signal when cosmetic effects (such as particles or sounds) should occur.
- Stacking. This defines whether the effect can stack on the same target, and if so, what the stacking limitations are.
You can read more about Gameplay Effects in the official documentation. It’s worth noting that Gameplay Effects rely heavily on Gameplay Tags, a general-purpose hierarchical labelling system in Unreal Engine. Specifically, they can be used to apply modifiers conditionally, and they’re used by Gameplay Cues to trigger cosmetic events.
Breaking it down further
While the breakdown above helps to understand what GAS can be used for and broadly how it works, there are some additional parts that are important to understand on a more technical level.
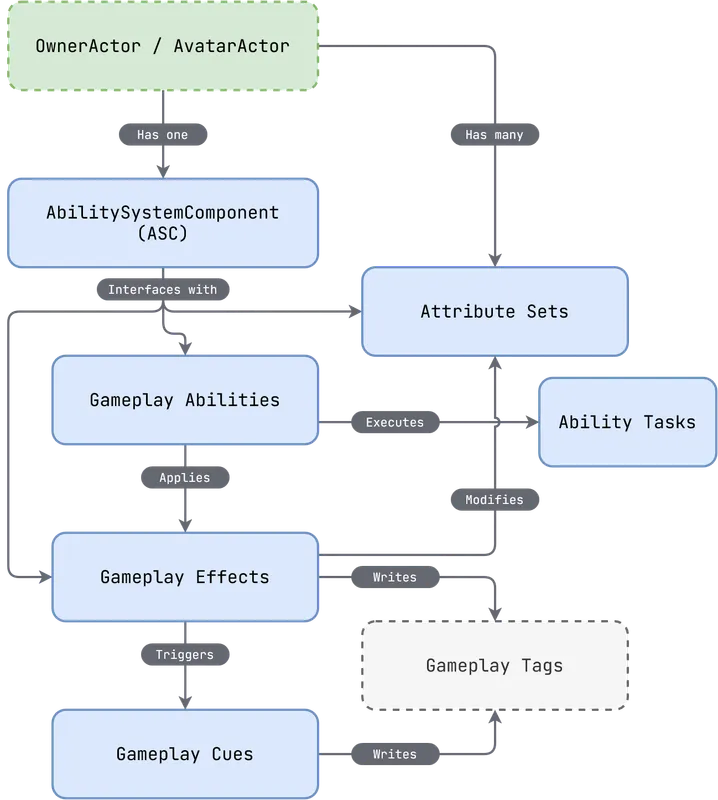
First and foremost is the Ability System Component (ASC). This component provides an interface to the GAS features detailed above. In a nutshell, it provides the following functionality:
- For Gameplay Abilities:
- Methods for granting abilities.
- Management of granted abilities.
- Replication of ability state (GAS has network replication built into it).
- For Gameplay Attributes:
- Methods for creating and querying Attribute Sets (more on this further down).
- For Gameplay Effects:
- Methods for applying effects to self or another target.
- Methods for querying or removing active effects.
The Ability System Component is initialised with two actor references: Owner and Avatar. This separation is optional, i.e. both can refer to the same actor, but the idea is that Owner is stateful and persistent while Avatar is the spatial actor that represents the actor in the world. Separating these can be useful when the spatial representation needs to be destroyed (e.g. respawned) without destroying all of the state associated with it.
Next is Attribute Sets. An Attribute Set contains attribute definitions as well as optional methods for implementing custom behaviour before or after attribute-related events. In most cases, at a minimum there should be a base Attribute Set that defines common attributes such as health, but this can be subclassed for specific types of actor (e.g. for players, who might have additional attributes).
Lastly, Ability Tasks. Ability Tasks are essentially asynchronous tasks fired off during Gameplay Ability execution. These tasks can either start doing work immediately (e.g. facing towards a target), or they can wait for something specific to happen before proceeding (like waiting for a target actor to come within a specified radius).
Putting all of these elements together, the system looks like this:
A practical example
I created a small single player project in Unreal Engine 5.4 to demonstrate how the Gameplay Ability System can be applied to a specific gameplay feature. It’s built on the C++ FPS template and consists of the following:
- A first-person player character with an attribute set containing an Energy attribute
- A blaster that can be picked up by the player
FireAbility, a Gameplay Ability implementation that executes projectile-firing logic and applies various effects, including an Energy cost and a cooldown- A basic HUD with an energy level bar that reads from the player’s Energy attribute
I’ll go over key parts of the implementation, but first, here’s how I enabled GAS in the project:
- Enabled the “Gameplay Abilities” plugin
- Added the following dependencies to the
[module].Build.csfile:
PrivateDependencyModuleNames.AddRange(new string[] { "GameplayAbilities", "GameplayTags", "GameplayTasks" });- Closed the editor, built the project, and re-opened the editor
Next, some groundwork in C++. Since the project uses the FPS template, I already had a character class, player controller, and a few other useful classes. I created the following C++ classes:
ABaseCharacter, which inherits ACharacter and implements IAbilitySystemInterfaceUBaseAttributeSet, which inherits UAttributeSetUCombatantAttributeSet, which inheritsUBaseAttributeSetUBaseGameplayAbility, which inherits UGameplayAbility
I also created the following Blueprint classes:
GA_FireEnergyWeapon, which inheritsUBaseGameplayAbility- Five Gameplay Effects inheriting UGameplayEffect:
GE_DefaultAttributesGE_WeaponEnergyCooldownGE_WeaponEnergyCostGE_WeaponEnergyRegenGE_WeaponEnergyRegenDelay
Let’s take a closer look at all of these…
ABaseCharacter
The base class for all character types. It includes the Ability System Component, an Attribute Set, an array of default Abilities and an array of default Effects:
protected:  UPROPERTY(VisibleAnywhere, BlueprintReadOnly, Category = "Abilities", meta = (AllowPrivateAccess = "true"))  class UAbilitySystemComponent* AbilitySystemComponent;
  UPROPERTY(VisibleAnywhere, BlueprintReadOnly, Category = "Abilities", meta = (AllowPrivateAccess = "true"))  class UCombatantAttributeSet* AttributeSet;
  UPROPERTY(EditDefaultsOnly, BlueprintReadOnly, Category = "Abilities")  TArray<TSubclassOf<class UBaseGameplayAbility>> DefaultAbilities;
  UPROPERTY(EditDefaultsOnly, BlueprintReadOnly, Category = "Abilities")  TArray<TSubclassOf<class UGameplayEffect>> DefaultEffects;
  virtual UAbilitySystemComponent* GetAbilitySystemComponent() const override;
The GetAbilitySystemComponent() member function is declared in IAbilitySystemInterface and simply returns the AbilitySystemComponent pointer:
UAbilitySystemComponent* ABaseCharacter::GetAbilitySystemComponent() const{ return AbilitySystemComponent;}The following protected member functions are also defined:
// Grants abilities specified in DefaultAbilitiesvoid ABaseCharacter::InitializeAbilities(){  if (!HasAuthority() || !AbilitySystemComponent) return;
  for (TSubclassOf<UBaseGameplayAbility>& Ability : DefaultAbilities)  {    FGameplayAbilitySpecHandle SpecHandle = AbilitySystemComponent->GiveAbility(FGameplayAbilitySpec(Ability, 1, static_cast<int32>(Ability.GetDefaultObject()->GetAbilityInputID()), this));  }}
// Applies effects specified in DefaultEffects// (useful for applying infinite effects such as passive health regeneration)void ABaseCharacter::InitializeEffects(){  if (!AbilitySystemComponent) return;
  FGameplayEffectContextHandle EffectContext = AbilitySystemComponent->MakeEffectContext();  EffectContext.AddSourceObject(this);
  for (TSubclassOf<UGameplayEffect>& Effect : DefaultEffects)  {    FGameplayEffectSpecHandle SpecHandle = AbilitySystemComponent->MakeOutgoingSpec(Effect, 1, EffectContext);    if (SpecHandle.IsValid())    {      FActiveGameplayEffectHandle EffectHandle = AbilitySystemComponent->ApplyGameplayEffectSpecToSelf(*SpecHandle.Data.Get());    }  }}
// OnWeaponEnergyChanged is a BlueprintImplementableEventvoid ABaseCharacter::OnWeaponEnergyAttributeChanged(const FOnAttributeChangeData& Data){  OnWeaponEnergyChanged(Data.OldValue, Data.NewValue);}
Lastly, I modified the existing constructor and two member function overrides, BeginPlay() and PostInitializeComponents():
ABaseCharacter::ABaseCharacter()  : AbilitySystemComponent{CreateDefaultSubobject<UAbilitySystemComponent>(TEXT("AbilitySystemComponent"))}  , AttributeSet{CreateDefaultSubobject<UCombatantAttributeSet>(TEXT("AttributeSet"))}{  // Set this character to call Tick() every frame.  You can turn this off to improve performance if you don't need it.  PrimaryActorTick.bCanEverTick = true;}
void ABaseCharacter::BeginPlay(){  Super::BeginPlay();
  AbilitySystemComponent->GetGameplayAttributeValueChangeDelegate(AttributeSet->GetWeaponEnergyAttribute()).AddUObject(this, &ABaseCharacter::OnWeaponEnergyAttributeChanged);}
void ABaseCharacter::PostInitializeComponents(){  Super::PostInitializeComponents();
  if (!AbilitySystemComponent) return;
  AbilitySystemComponent->InitAbilityActorInfo(this, this);
  InitializeAbilities();  InitializeEffects();}
Altogether, this provides characters with a way to specify abilities that should be granted by default, a way to specify effects that should be applied by default, an Attribute Set with a Weapon Energy attribute, a Blueprint event for responding to changes in the Weapon Energy attribute, and a way to interface with GAS features (AbilitySystemComponent).
UBaseAttributeSet
A simple implementation of UAttributeSet. The whole class declaration looks like this:
UCLASS()class ARMAROSUNREAL_API UBaseAttributeSet : public UAttributeSet{  GENERATED_BODY()
protected:  virtual void PreAttributeBaseChange(const FGameplayAttribute& Attribute, float& NewValue) const override;  virtual void PreAttributeChange(const FGameplayAttribute& Attribute, float& NewValue) override;
  virtual void ClampAttributeOnChange(const FGameplayAttribute& Attribute, float& NewValue) const;};
It also defines the following macro (used in the next class, UCombatantAttributeSet) as suggested in the source documentation:
#define ATTRIBUTE_ACCESSORS(ClassName, PropertyName) \ GAMEPLAYATTRIBUTE_PROPERTY_GETTER(ClassName, PropertyName) \ GAMEPLAYATTRIBUTE_VALUE_GETTER(PropertyName) \ GAMEPLAYATTRIBUTE_VALUE_SETTER(PropertyName) \ GAMEPLAYATTRIBUTE_VALUE_INITTER(PropertyName)The implementation simply uses PreAttributeBaseChange and PreAttributeChange to clamp the new attribute value:
void UBaseAttributeSet::PreAttributeBaseChange(const FGameplayAttribute& Attribute, float& NewValue) const{  Super::PreAttributeBaseChange(Attribute, NewValue);
  ClampAttributeOnChange(Attribute, NewValue);}
void UBaseAttributeSet::PreAttributeChange(const FGameplayAttribute& Attribute, float& NewValue){  Super::PreAttributeChange(Attribute, NewValue);
  ClampAttributeOnChange(Attribute, NewValue);}
// This is a no-op and is intended to be overridden by inheriting classesvoid UBaseAttributeSet::ClampAttributeOnChange(const FGameplayAttribute& Attribute, float& NewValue) const{}
UCombatantAttributeSet
This is the Attribute Set that gets assigned to characters and includes three attributes:
  UPROPERTY(BlueprintReadOnly, Category = "Attributes", Meta = (AllowPrivateAccess = true))  FGameplayAttributeData WeaponEnergy;  ATTRIBUTE_ACCESSORS(UCombatantAttributeSet, WeaponEnergy);
  UPROPERTY(BlueprintReadOnly, Category = "Attributes", Meta = (AllowPrivateAccess = true))  FGameplayAttributeData MaxWeaponEnergy;  ATTRIBUTE_ACCESSORS(UCombatantAttributeSet, MaxWeaponEnergy);
  UPROPERTY(BlueprintReadOnly, Category = "Attributes", Meta = (AllowPrivateAccess = true))  FGameplayAttributeData WeaponEnergyRegen;  ATTRIBUTE_ACCESSORS(UCombatantAttributeSet, WeaponEnergyRegen);
It also includes a constructor and a member function override for ClampAttributeOnChange():
UCombatantAttributeSet::UCombatantAttributeSet()  : WeaponEnergy{0.0f}  , MaxWeaponEnergy{60.0f}  , WeaponEnergyRegen{1.0f}{}
void UCombatantAttributeSet::ClampAttributeOnChange(const FGameplayAttribute& Attribute, float& NewValue) const{  if (Attribute == GetWeaponEnergyAttribute())  {    NewValue = FMath::Clamp(NewValue, 0.0f, GetMaxWeaponEnergy());  }}
UBaseGameplayAbility
The base class for all Gameplay Abilities. This simply encapsulates a way to configure a unique input identifier per ability (explained in the next section):
UCLASS()class ARMAROSUNREAL_API UBaseGameplayAbility : public UGameplayAbility{  GENERATED_BODY()
  UPROPERTY(EditAnywhere, Category = "Ability")  EAbilityInputID AbilityInputID{ EAbilityInputID::None };
public:  EAbilityInputID GetAbilityInputID() const { return AbilityInputID; }};
EAbilityInputID is an enum defined in the module’s main header ([module].h):
UENUM(BlueprintType)enum class EAbilityInputID : uint8{ None = 0, Confirm = 1, Cancel = 2, FireAbility = 3};Boilerplate alterations
Along with the new classes, I made some alterations to the classes provided by the FPS template.
The first is the character class. In my project, it’s called AArmarosUnrealCharacter. I defined an input action for the Fire ability and a couple of member functions for handling ability inputs:
private:  UPROPERTY(EditAnywhere, BlueprintReadOnly, Category=Input, meta=(AllowPrivateAccess = "true"))  UInputAction* FireAbilityAction;
protected:  virtual void SendAbilityLocalInput(const FInputActionValue& Value, int32 InputID);  void FireAbility(const FInputActionValue& Value);
In the SetupPlayerInputComponent function, I set up the binding for FireAbilityAction:
EnhancedInputComponent->BindAction(FireAbilityAction, ETriggerEvent::Triggered, this, &AArmarosUnrealCharacter::FireAbility);Lastly, SendAbilityLocalInput and FireAbility look like this:
void AArmarosUnrealCharacter::SendAbilityLocalInput(const FInputActionValue& Value, int32 InputID){  if (!AbilitySystemComponent) return;
  Value.Get<bool>()    ? AbilitySystemComponent->AbilityLocalInputPressed(InputID)    : AbilitySystemComponent->AbilityLocalInputReleased(InputID);}
void AArmarosUnrealCharacter::FireAbility(const FInputActionValue& Value){  SendAbilityLocalInput(Value, static_cast<int32>(EAbilityInputID::FireAbility));}
Note that this is where the EAbilityInputID enum I mentioned earlier comes in. This is how bound inputs are assigned to abilities - the enhanced input binding above calls FireAbility when the input is activated, which in turn calls SendAbilityLocalInput, informing the ASC when the input starts and ends. Any granted abilities that are configured with the received input ID will be executed as long as conditions are met.
You might also have noticed the enum contains “Confirm” and “Cancel” input IDs. These are used by Ability Tasks to signal confirmation or cancellation, which is out of scope for this particular project.
GA_FireEnergyWeapon
The blueprint for this ability obtains a reference to the actor executing the ability (obtained via the “Get Avatar Actor from Actor Info” node), attempts to commit the ability (which can fail if conditions aren’t met, e.g. an attribute value is too low), calls the Fire function on the weapon component, commits the ability’s cooldown (GE_WeaponEnergyCooldown), and applies a delay effect before regen can resume (GE_WeaponEnergyRegenDelay):

The cooldown (GE_WeaponEnergyCooldown) and regen (GE_WeaponEnergyRegen) are configured on the ability via the class defaults:

GE_DefaultAttributes
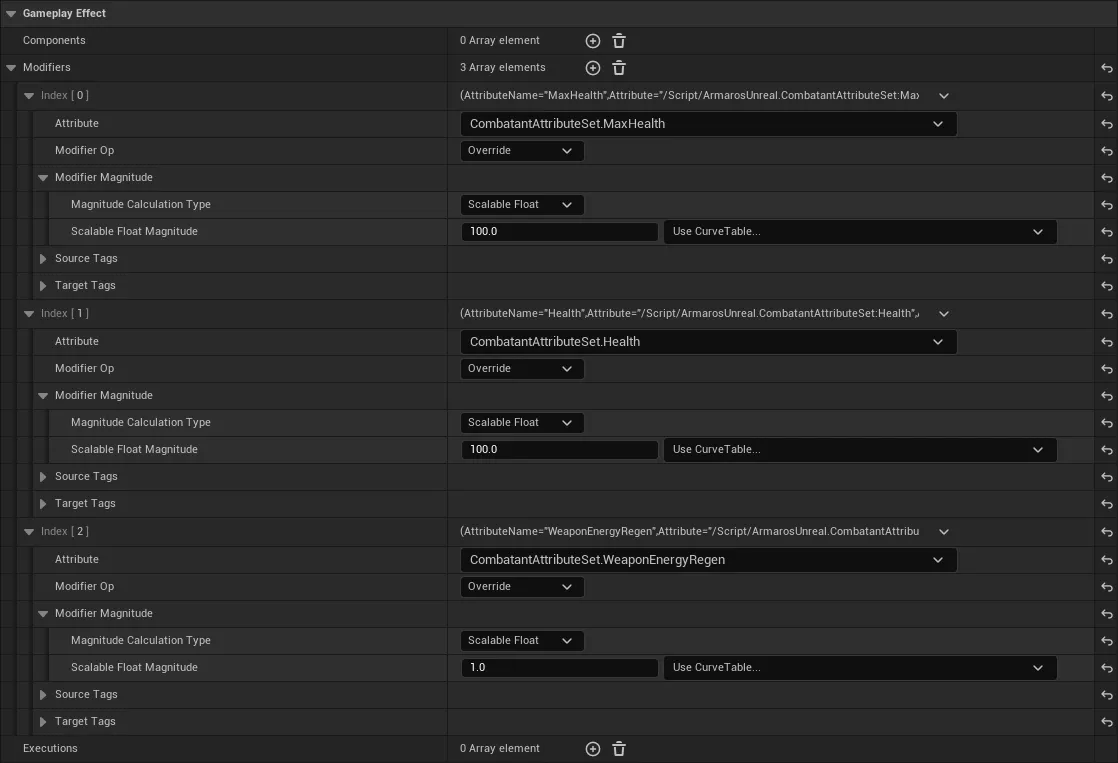
This overrides some of the default attribute values for UCombatantAttributeSet and is added to the player character’s default effects via class defaults:
GE_WeaponEnergyCooldown
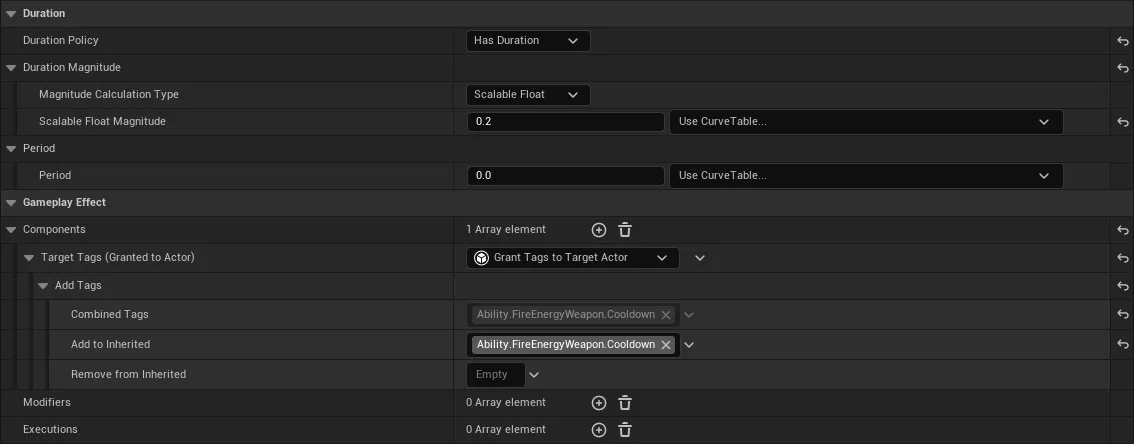
This enforces a delay between shots when firing the weapon. It’s configured with a 0.2 second duration and grants the Ability.FireEnergyWeapon.Cooldown tag to the actor to signal when the cooldown is in effect:
GE_WeaponEnergyCost
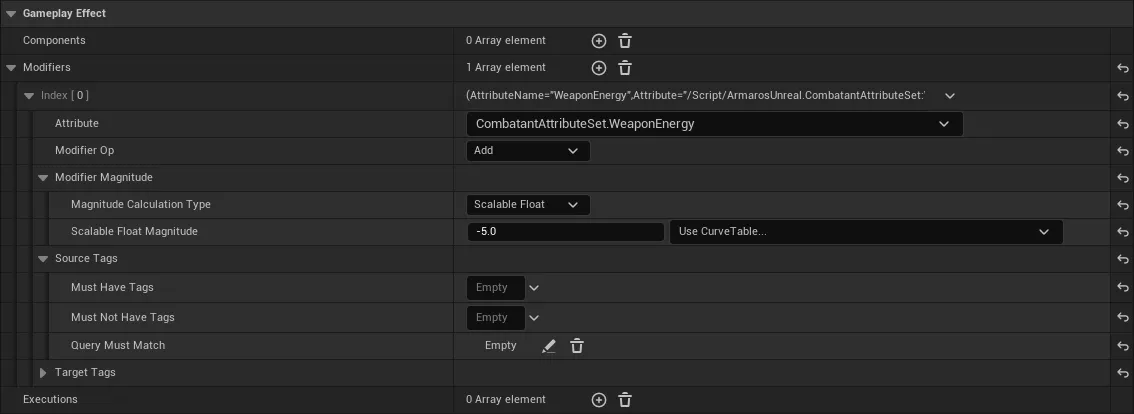
This is an instant effect that deducts from the WeaponEnergy stat:
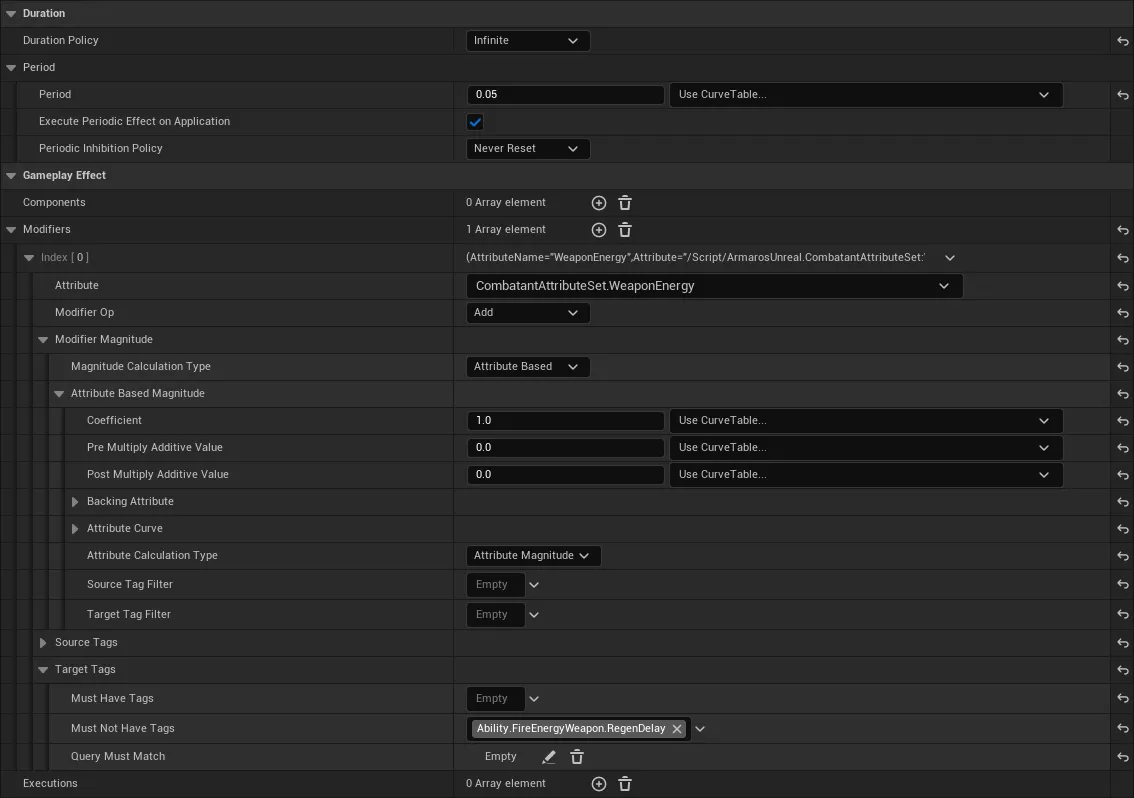
GE_WeaponEnergyRegen
This passively regenerates 1 WeaponEnergy every 50ms as long as the actor doesn’t have the Ability.FireEnergyWeapon.RegenDelay tag:
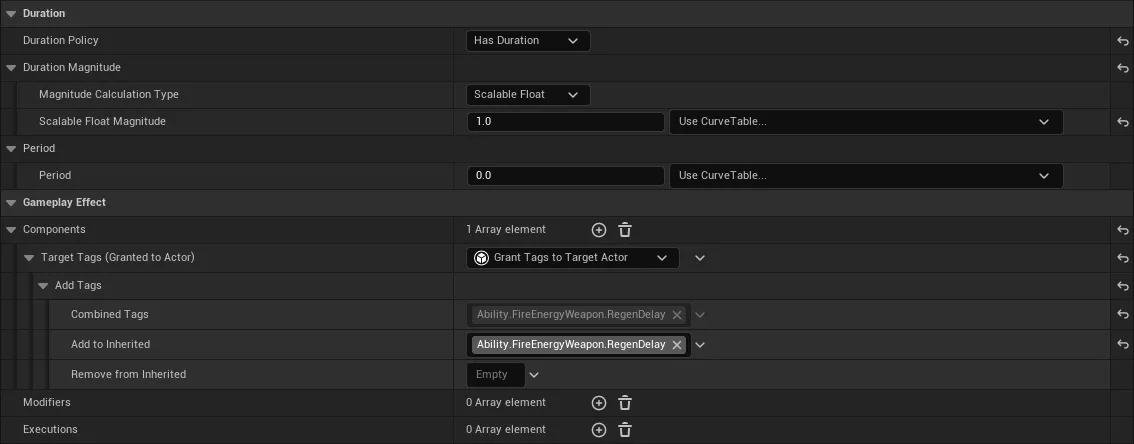
GE_WeaponEnergyRegenDelay
This applies the Ability.FireEnergyWeapon.RegenDelay tag for a duration of 1 second:
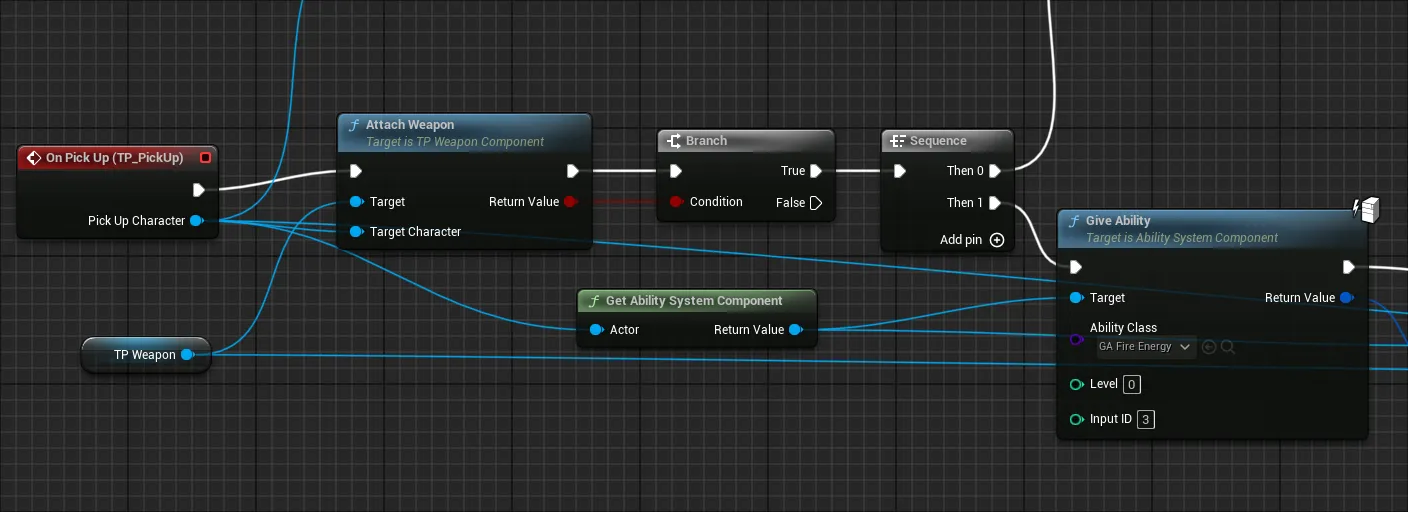
BP_PickUp_Rifle boilerplate modifications
In order to drive the projectile-firing functionality of the weapon via FireAbility instead of handling it directly, I needed to modify the BP_PickUp_Rifle blueprint to grant the ability to the player when they pick the weapon up:
The result
With all of those pieces in place, we have a functional energy weapon that can be picked up by the player and fired using their Energy attribute. There are a few other parts to this project that I haven’t detailed, such as the Energy attribute integration with the Energy bar in the HUD, the sound effects, the bouncing projectiles, etc - but hopefully the power of the Gameplay Ability System comes through in this small example. Here’s how it looks:
Why use GAS?
You might still be wondering why you should use this system. After all, it’s easy enough to implement a lot of what I’ve shown here without using it at all, and some of it is functionality you get out of the box with the starter templates. This system also has a steep learning curve, and the true power of it isn’t necessarily obvious until you use it a few times yourself.
Nonetheless, there are many reasons to consider using it, and the ones that come to mind based on my own experience with it are:
- Once the groundwork is done, it’s a very powerful system that unlocks tons of options and control for gameplay designers
- It provides a range of conventions for handling things that are common to the vast majority of games, which is good for teams - there’s a high likelihood that anyone new joining a team will have at least some GAS experience, whereas they’d have no knowledge at all of any gameplay systems custom-built by the team
- It comes with some network replication and prediction capabilities out of the box, so you can spend less time making those things work correctly for your gameplay features
- It provides a solid foundation for more complex gameplay as your game design evolves
Ultimately, I think it’s worth considering for any new projects unless you’re a solo developer who is very comfortable doing things without GAS. Even then, I encourage you to explore it, and I hope this post has at least sparked your interest!
Further reading
The official documentation for the Gameplay Ability System is somewhat lacking. It mainly covers the high-level concepts and doesn’t go into much detail regarding the actual usage. Thankfully, there are a few resources that fill in the gaps:
- The public GAS source files. They’re reasonably well-commented and you can find a lot of information in the comments that isn’t included in the documentation. In particular:
- tranek/GASDocumentation is a long-established, ongoing effort to understandand GAS and document it in detail. It’s an excellent resource that is endorsed by Epic in the official docs.
That’s all for now. As always, thanks for reading!